This is a perfect time for you to clean out your dressers, closets, and storage.
You know how it goes. You fall in love with a new place, whether it be a house, apartment, condo, or what have you, and you get a move in date. And then what? You have to pack. But you don't want to pack up those things that you have stuffed in the farthest corner of your closet and haven't looked at in years. Do you really want to haul all of that crap over to your new place just to stuff it into the back of a new closet and forget about it, do you? It's a lot of work to move, so in order to save yourself some energy, it's usually best to wade through everything.
I am in the process of packing to move and it is not always rainbows and sunshine. Sometimes it is downright not fun at all! I am currently in the period where I have to clean out my childhood bedroom and get rid of things that have been stuffed in the back of my closets and drawers for 10+ years. And I am a shopper, so I have a lot of stuff that I have collected over the years!!
Last night I pulled clothes out of one section of my dresser and began sorting into 3 piles; KEEP, DONATE, and TRASH.
I find that it is hard to part with things at first, so I generally go through all the clothes in the KEEP pile at least twice, because on the second look I can be more critical and less emotionally attached to the items. I also try on everything in the keep pile so I am less likely to keep things that don't fit me right any more.
I also always DONATE any clothes that aren't ripped or stained. My church has a clothing closet where they give away clothes and accessories to people in the community that can't afford a lot. {I also donate all of my formal dresses because they can get expensive for girls going to homecoming or prom.} They also take shoes, accessories, and even household items. You never know what people will need and I am glad that my church finds serving the community so important!
The TRASH pile gets anything that has holes, stains or any other issues that would prevent anyone from wanting them. It also gets anything that people don't generally want second hand, like under clothes and socks, shoes that are old and dirty looking, etc.
Monday, July 30, 2012
Friday, July 27, 2012
More jewelry organization ideas
I am still on the hunt for a great inspiration of what to do to house and display all of my jewelry! Like I said last time, I have some big requirements to fulfill for this project. Check out my last blog to refresh your mind about what those requirements are. I have been scouring the internet for that one great, jaw-dropping, I-can't-believe-I-didn't-come-up-with-this-sooner idea! In my research I came across some more good ideas that could develop into great ideas, or be great ideas for someone else!
So here are some of those inspirations for your delight and use:


So here are some of those inspirations for your delight and use:


 |
| A friend made one of these and it is fabulous! |

 |
| This is a silverware drawer organizer re-purposed into a jewelry organizer. Such a good idea! |
Wednesday, July 25, 2012
DIY jewelry holder ideas
Here is my latest dilemma: I need to figure out a unique way to organize my jewelry. I have a few stipulations though: 1. I want it to have some element of DIY {for obvious reasons} 2. it needs to fit in a small area that is mostly hidden when the bedroom door is open 3. it has to be high enough that my niece and nephew can't get into it and play with it, but low enough to accommodate my short stature! These are some peculiar stipulations, I know, but I do what I can with what I have!
I found some interesting ideas online and I hope to incorporate some of those ideas with some of my own ideas and therefore create wonderfulness!! {Don't judge for my word choices!!}
Here are the pictures that I found online and I will keep you posted on what I come up with!


I found some interesting ideas online and I hope to incorporate some of those ideas with some of my own ideas and therefore create wonderfulness!! {Don't judge for my word choices!!}
Here are the pictures that I found online and I will keep you posted on what I come up with!


Monday, July 23, 2012
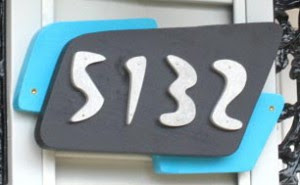
House address numbers
There are some cool ideas for house numbers that I have seen lately! Here are some pictures of different ideas that I have found online and from driving around that I was really inspired by and I think you might like them too!


Friday, July 20, 2012
Floorboard memories
Something that I really wanted to do before we laid the tile down in my bathroom was to write memories and verses and names on the floor as a little secret way to remember things. I want it to be somewhat of a time capsule that someone will discover when they rip the tile up in the future! It was a lot of fun to come up with things to leave as a legacy for the next owners!
I got the idea from a church in my area that invited all of their members to come in before the carpet was put down and write peoples' names that they were committing to pray for their salvation. Years later, the church was sold to another church organization and when they remodeled it they found all of the names of people. It would be interesting to know if any cool things happened with these people!
Here is an update on what I did in my bathroom to memorialize my time of life living in this house!


What would you write as a time capsule of sorts?
Wednesday, July 18, 2012
Wedding Decor just for me
.. In honor of wedding season, I wanted to do a blog (or series of blogs) of wedding ideas for decor. I love the trend of outdoor, rustic weddings that are all the rage right now. I hope that when I end up getting married this concept is either still in, or far enough out that it seems cool again! Either way, I don't really care! I have always liked what I like and don't care too much what other people think about it! So here are a few different ideas that I think are adorable and will hopefully be represented in some form at my wedding! I found all of them on Etsy {love that website!} and they are all relatively inexpensive.


 I love Mason jars! They remind me of the days when I used to help my great-grandmother can tomatoes and seeing all of the canned foods in her basement fruit cellar that she kept stocked! I guess that's what happens when you live through the Great Depression and all the fear of wars. Mason jars are all the rage right now, so if they are your thing too, my suggestion is to stock up now while they are cheaper!! You can also find cool glass jars at antique stores and flea markets for cheap. I also think the blue color
and the waves in the bottom picture are really cool!
 I really like the looks of burlap, especially for a wedding decoration. Burlap is pretty cheap too. I think this idea of adding lace trim to the edges is a great way to add a bit of class and make it unique!

 These baskets would be adorable for a little flower girl to carry down the aisle! It's not too big and bulky and they are unique! I've seen the typical flower girl baskets at wedding shops and I don't like that cookie-cutter feel. I want something like this for my niece to carry down the aisle on my day!
 My faith is really important to me, and if I am not getting married in a church I want some representation of that faith and our commitment to God in the ceremony. This cross is really interesting with the rustic wood and lack of straight lines and beat up look. It would be perfect in the type of wedding that I want to have!
Here are the links to the Etsy sites for the things pictured aboveflower-girl-basket
burlap-runner
first-flower-girl-basket
rustic-wood-cross
wavy-blue-glass-lights
hanging-mason-jars
garden-stake-mason-jars


and the waves in the bottom picture are really cool!


Here are the links to the Etsy sites for the things pictured aboveflower-girl-basket
burlap-runner
first-flower-girl-basket
rustic-wood-cross
wavy-blue-glass-lights
hanging-mason-jars
garden-stake-mason-jars
Monday, July 16, 2012
Table Setting Decor Inspiration
I am a typical girl in that I plan my wedding in my head all the time! Ok maybe not ALL the time, but if I come across something I think is really cute I come up with ways to incorporate it into my future wedding. {Whenever that may be!} I came across this inspiration on a blog that I regularly follow. The author has some really cute ideas and I enjoy the honest and slightly sarcastic way that she writes! The blog is thriftydecorchick, you should check it out and follow her as well!
The blog that I saw this morning and was instantly inspired by was coral summer tablescape. She was sent a set of dishes from Target {so jealous! How do I get them to send me stuff? lol} and she put together an entire table setting with adorable centerpieces and chargers and everything based on the colors and the season! There are tons of pictures on the blog itself, but here is a highlight reel of sorts!


I saw these and thought how cute this would be for the kind of wedding that I want to have. I want a simple, fun wedding feel. Stress-free and relatively cheap would be nice too! I love the Mason jars and babies breath and jars with sand or rice and little votive candles surrounding a larger jar with a simple flower arrangement! And I love the wooden table that it's all sitting on. The pink coral color is great for a summer garden party, but I think I would do different colors for my wedding scheme!
This table setting is simple looking, but it is beautiful!
Friday, July 13, 2012
Bedroom renovation is almost complete!
It has been fun getting to share my hard work with you! It has been more work than I have done myself in the past and it has been worth it. Let me just say that I love to paint! It is relaxing and I can clear my mind and just paint without thinking about the other things that usually fill my mind. That being said, I am so sick of painting!! The walls weren't the problem, but the chocolate brown doors were. They are a pain the butt to paint back to white! They have taken at least 3, sometimes 4 coats to cover it and it's still not 100% covered! All the creases and corners are the hardest part. A word to the wise: DON'T PAINT DOORS DARK COLORS!! The next person to paint them will really appreciate it!
So I wanted to give you a complete update on what my bedroom used to look like and what it now looks like! You can look back through my past blogs and find all of these pictures too, but I wanted to lay out the before and afters for you all together right here:
I hope you can see the drastic difference that happened! It went from brown tones and a country blue color, to gray tones and a bold navy/cobalt blue! The only color that stayed the same in the whole room was the white stripes! I can't wait to get furniture moved in and decorate!! I will continue to update you when there is furniture in the room!
So I wanted to give you a complete update on what my bedroom used to look like and what it now looks like! You can look back through my past blogs and find all of these pictures too, but I wanted to lay out the before and afters for you all together right here:
 |
| Original paint... I hated it from the moment I walked in! I'm not a fan of brown! |
 |
| Blue and light gray have been painted. The wall has paneling so that is why the stripes stayed. But those ridges were tricky to paint and keep all the colors from running into the other colors. I didn't use any paint on the stripes, that is all free handed very carefully! |
 |
| And the final result! I love it!! The colors are bold but not overwhelming!! |
I hope you can see the drastic difference that happened! It went from brown tones and a country blue color, to gray tones and a bold navy/cobalt blue! The only color that stayed the same in the whole room was the white stripes! I can't wait to get furniture moved in and decorate!! I will continue to update you when there is furniture in the room!
Wednesday, July 11, 2012
Bathroom update
Here is a quick update about the remodeling of my bathroom. It was a horribly ugly mess, but it is coming together quite nicely already. So far we have taken out the old sink, fixed the toilet, started painting the walls, cleaned things, and painted the doors white from chocolate brown. You can check out the original state of the bathroom here Tale of an ugly bathroom.
I am pretty excited to see things shape up so quickly! As I posted last, the toilet no longer spews water everywhere when flushing! The racks came off the walls and the holes have been filled. Behind the toilet is painted the lightest shade of gray possible, and the color is growing on me! And the most exciting part is that the stupid, ugly truck stop sink was taken off the wall along with the dumb splash guard that was around it!

The walls still need to be sanded down and painted to cover the orange-red sponge painting that was going on. We are also eventually putting stick down tile over the orange-red painted concrete that is the bathroom floor right now. It is really exciting to be able to hand pick all of the things that will surround me for however long I end up living there. I hope that when I buy my own home sometime in the future that it will need a little love so I can put my own unique touches into it too.

The vanity that we bought was just plain white with a white counter top and sink and silver handles. I am in the process of painting the cabinet part a charcoal gray. I am always guilty of forgetting to take pictures of the before, so I will take as many pictures of the process as possible. I apologize for the lack of quality before and afters, it is something I am working on!
The other day I was painting the door in the bathroom white, and I wasn't worrying too much about getting paint on the floor because it is going to be covered up. My niece was sitting on the floor next to me chatting and noticed that one of my paint splatters had made an "M". She thought it was so cool that her initial was on the floor and told me I wasn't allowed to paint over it! She gave me a great idea. Before we put the tile down I want to take sharpies or paint and write all over the concrete so it will be a memory hidden under the floor that no one will know about. I heard about a church that was redoing the flooring and asked all the members to come with markers and write the names of people that they were committing to pray for to come to know Jesus. I think that is so cool! Years later, a different church bought the building and during the remodeling process found all the names written on the floor. I want to do that too so some day, when the next person buys the house and replaces the floor they will find names of people I am praying for, and Bible verses that speak to me, and fun memories from the previous owner! You never know what could come of that! I will be sure to take pictures and update you all on that project when it happens!
What would you want to write under the floors in your home as a time capsule of sorts?
Monday, July 9, 2012
Tip for painting a bathroom
Here is a random tip for you that I never thought of before this project. I could be totally behind, but I thought it was clever!!
When my dad and I were at the new house last night, he was working on the toilet. It had a nasty habit of spraying water everywhere when flushed! So after the hundredth time of tightening bolts and checking seals, he finally took the back of the toilet completely off to dump the water out and check seals and pipes again. While he was doing that, I had a brilliant idea! The walls need to be painted still, and it is a pain in the butt to try to paint behind the toilet tank. So while he was messing with the tank outside, I grabbed the paint and a brush and went to town painting everything that I knew I wouldn't be able to reach when the toilet was put back together.

Like I said, probably not the most ingenious thing anyone has ever thought of, but I was pretty proud of myself for thinking ahead like that!
I wasn't too sure of the new color at first. It is a very light (almost white) gray color, but in the can it looked white. But once it was on the wall I loved it! That toilet seat will have to go as well!!
Thanks for letting me share my random tips with you today! I hope you have a great day!
God bless
Friday, July 6, 2012
Little helpers
Renovation is hard work... just ask these little helpers!
 A sprained ankle to show for all her efforts! Her first major injury at the new house! (I'm sure there are many more to come.)
 This is a weird face, but I was trying to show the big paint splotch on his nose left over from last night's painting adventure! He was so tired, he fell asleep on the ride back to my parents' house and was out cold for the night, so no bath for him last night!!
Both kids were big helpers and so excited to do whatever we needed! Kids love to help and if you give them small projects you can keep them busy for hours!!


Both kids were big helpers and so excited to do whatever we needed! Kids love to help and if you give them small projects you can keep them busy for hours!!
Wednesday, July 4, 2012
Renovation day 1!!
We finally have keys to the house! It has been a long time coming and I am so glad it finally happened! The first things we did were to fix the sinks and toilets. They all leaked from sitting empty for a while. The house was bank owned for a while before we got it, so it has some issues, but nothing a handy father can't fix (so far!!) The toilet in the basement leaked pretty bad. Someone suggested a new toilet all together, but that turned out to be an over reaction. All it needed was a new seal and to be tightened up. My dad also replaced the "guts" of the back of the toilet and the handle so it works like new!
I started painting my bathroom, beginning with the ceiling, then I got done with that and started painting the door. No one knew I was painting the door so when they came down to check my progress they were surprised! The way I see it, don't leave me alone with a can of paint in the world's ugliest bathroom!
I also painted the base boards and the door going into my bedroom. The colors in this basement were awful... I just don't understand why anyone would do this to an innocent house!!
I started painting my bathroom, beginning with the ceiling, then I got done with that and started painting the door. No one knew I was painting the door so when they came down to check my progress they were surprised! The way I see it, don't leave me alone with a can of paint in the world's ugliest bathroom!
 |
| I want white doors, or gray doors, or some fun colored door... I got chocolate brown doors. But they are chocolate no more!! When it is all said and done I will have put at least 3 coats of Kilz on the doors to cover the brown. NOTE TO SELF** don't paint doors dark colors! |
Monday, July 2, 2012
T-shirt upcycle: Racer back Tank top
I got this idea from pintrest. I find that I have more t-shirts than I know what to do with and I have a hard time parting with them! They are full of memories, but I rarely wear them. Some of them are men's shirts so the sleeves are too long and the neckline doesn't quite fit right. Here is my solution: make a racerback tank top out of an old t-shirt.

 |
| I forgot to take a before picture, but I think you get the idea! It was just a regular t-shirt that I started cutting up! You can see where I cut the sleeves off and around the neck. To create a more flattering, v-neck shirt, I cut a V into the front of the shirt. |
 |
| I started with a deep V cut into the back of the neckline, deeper than in the front. I cut the back a little farther in along the arm holes also so there wasn't quite as much material bunched up. Then I took a scrap of fabric from another part of the shirt and stretched it out as much as possible until it was long and skinny. Then I just wrapped it around the back where it would gather and tied it and snipped the ends. |
 |
| Here is an up close picture of the tie on the back, |
 |
| My final product! I think it is so much more flattering than the old boxy t-shirt it was in its former life! |
Subscribe to:
Posts (Atom)