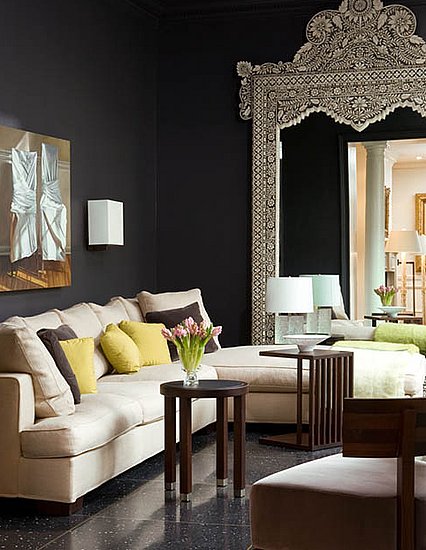
Wednesday, May 30, 2012

Sleeping in the garage never looked so good!


Extreme Design Makeover: Garage Turned into Modern Living Area

SHED Architecture & Design is a team from Seattle that has recently redesigned a 320-square-foot garage, turning it into an amazing living space. This renovated garage has so much to offer, that it resembles in functionality with a common all-equipped apartment. The team that did the conversion made sure the garage function was kept and so they came up with a lot of ingenious solutions for storage. One of this ideas was to use an old garage support for storing kitchen pots. Bookshelves can be found all around this modern space, as a cool and subtle system of shelving was also implemented. We really like the “bedroom area” and we think sleeping there could be fun. If you take a closer look, you will notice that this place is not just functional, but also aesthetic, which completely redefines the idea of living in a garage. Don’t you agree?- via DigsDigs


garage conversion 1 554x416 Extreme Design Makeover: Garage Turned into Modern Living Area

garage conversion 2 Extreme Design Makeover: Garage Turned into Modern Living Area
garage conversion 5 Extreme Design Makeover: Garage Turned into Modern Living Area
garage conversion 3 Extreme Design Makeover: Garage Turned into Modern Living Area
garage conversion 4 Extreme Design Makeover: Garage Turned into Modern Living Area
garage conversion 8 Extreme Design Makeover: Garage Turned into Modern Living Area

Monday, May 28, 2012

My dream bedroom

I have compiled a group of pictures, ideas and inspirations for my dream bedroom. These are things that I will probably never be able to afford, but if money were no issue I would live in a room surrounded by all the pretty things below!


I think I have decided on a navy blue wall color as an accent wall, and a lighter grey color on the other walls. I like to live in a room that is a little darker. It makes me feel more relaxed and has a calming effect on my nerves! Plus, grey isn't as much of a commitment to a certain color palette. Grey goes with pretty much any other color.

This comforter is absolutely fabulous! It's a light grey color with big flowers and ruffles. It's not over the top girly, but just enough to make me happy!


South Shore Summer Breeze Antique Blue Double Dresser and Mirror Set
I love the look of these dressers. They are vintage looking but modern at the same time


I love fancy door knobs! It brings an element of originality and personality to an otherwise cookie cutter piece of furniture.


KS0707MC-L-large hexagon metal bird cage
Decorating with birdcages is very "in" right now. But I think it can also be a classic trend.

Friday, May 25, 2012

The Psychology of Color

Psychology of Color [Infographic]
If you go back through many of my past posts you will notice a trend happening. I love color! It has always fascinated me to learn about how colors influence moods and work ethic and drive. I found this on Pintrest. It is cool to see how different brands and kinds of organizations use color to motivate people or give hints about the kind of customer they are looking to attract.

Wednesday, May 23, 2012

DIY vintage shutters and kitchen chair

My parents will never understand my love of all things old and battered looking! But it is a great way to bring things to life again and flex your creative muscle!


I didn't expect these to be quite this tall, but I was pleasantly surprised! One is clearly more battered than the other, and it looks like the other was either battered by bird poo or white paint... I really hope it was paint!!


As you have probably guessed by now, I love a project! I love taking old things that no one loves anymore and making them beautiful again. New things are nice, but I prefer things with history. I know this is cheesey but I love things that come with stories of lives they have already lived! Plus, with old things you can make them your own. You can strip them down, sand them down, and make them fit with whatever style or theme you have going on in your space!

These are a few examples of my recent finds that need some love and attention before they turn into pieces of beauty again. I am a little stuck with what to do with them. I have started a collection of wooden kitchen chairs. The first one I bought last summer I sanded down and painted a sunshine yellow color. I am not sure what color this new addition wants to be. I was thinking maybe a navy blue, but yellow and blue are the colors of the University of Michigan and I don't want to get involved in the UofM vs. MSU rivalry! But if I kept them in different areas of the house no one would notice, right? Do you have any ideas? I am open to suggestions!


I started by scraping off the cracking and flaking paint from the entire chair. It was pretty effective actually! The seat needed the most attention with the puddy knife, but the back and legs were chipping pretty badly too.


It was such a beautiful day outside I had to take advantage of it!


Somehow I always end up with yellow chairs. The first chair I purchased and refinished was yellow to begin with as well! There was also some aqua colored paint under the yellow. It's always interesting to see what colors these chairs were in their past lives!

Monday, May 21, 2012

Stained Glass: Not just for church windows anymore

I have always been fascinated by stained glass. In fact when I was little I wanted to become Catholic just to go to a church with the fancy windows! When I was in Chicago a few years ago I stumbled upon the stained glass museum on Navy Pier. Needless to say, I was in love! I recently went back there and had to make a trip to the museum again. I was really inspired by the colors and textures of the glass.

Here are some pictures that I took of the different windows:

If you look closely, you'll see that there are tiny circles making up this design. I love the colors that don't match, but coordinate.

The shapes in this window could easily be translated into some beautiful design inspiration!


This window uses a lot more clear glass than most and just uses pops of color.


This one is my favorite! Notice the subtle fades of color without the usual bars dividing the different colors. This is one that is not done justice in pictures but must be seen in person!


What kind of design inspiration can you get from this? The colors. The textures. The shapes and symbols. The subtle elegant beauty or bold powerful punches of color. There are so many things that are inspiring when it comes to stained glass!

Friday, May 18, 2012

Bleach stains made cool!

Here is a cool idea to try. This is especially great for old t-shirts that are super comfortable but got a stain or bleach spot on them somewhere. Just cover that bad boy right up!!
DIY Bleach Pen T-Shirts. Draw your picture in chalk first then go over it with a bleach pen. holy coolness >> whoa! What a smart idea, one of those "how did I never think of that" moments!

Here is another one I found on Pintrest! Gotta love that website for sure!

Use foil underneath, draw with bleach pen, wait 30 minutes then wash. Great for writing words!

Wednesday, May 16, 2012

The architecture of beautiful churches

I have always loved the architecture and detail of old churches. It has something to do with growing up going to church every week, I'm sure. I think we can get tons of inspiration from looking at old churches. Here are a few that caught my eye this morning. What inspiration can you pull from these photos?


Beautiful Church In Shoreline Connecticut, USA
Beautiful Church In Shoreline Connecticut, USA – Via Flickr
I love the colors in this (clearly enhanced) photo. Oranges are so in this year and the stark contrast with the green gives some great interest in this pic. 

A Church In Copenhagen, Denmark
A Church In Copenhagen, Denmark – Via Flickr
The architecture of this tower is beautiful. It puts an interesting twist on the usual church steeple. I love the spiral feel and the windows and statues lining the roof.

A Church In Old Florida, USA
A Church In Old Florida, USA – Via Flickr
This is absolutely stunning! The yellow looks so good with the darker trim. I also am really inspired by the detail on the windows and over the door.

Temple Church in North Dublin, Ireland
Temple Church in North Dublin, Ireland – Via Flickr
 The simple brick of this church is stunning. I also love clocks, although on closer inspection you'll notice that the 2 clocks we can see in the picture are set to different times. I wonder why!

A Church In  Moscow
A Wonderful Church In  Moscow – Via Flickr
All the patterns and colors and textures really brings this building to life and makes it a stop in your tracks kind of place to visit! Legend has it that the man who had this cathedral built blinded the architect after it was completed so he could never build something equally as beautiful again. Kind of crazy!

Monday, May 14, 2012

This is what I tore up vintage Shakespeare for!

A few days ago I posted pictures of the beginning of a project to cover canvas with vintage book pages and add buttons. I couldn't wait any longer to finish this project, so after work I rushed home and spent the few precious hours I have of peace pasting and decorating my canvas. I had to mod podge the other 3 canvases with book pages first. Then I began to arrange buttons on the dry canvas to decide what my word would be. I decided on the word FAITH because without faith I have nothing, and made the first canvas the F. But I had to figure out how I was going to do that because I only had 4 canvases and faith is 5 letters! I could have put the t-h together since they make one sound, but I thought putting the a-i together would make more sense {and they also make one letter sound}. I also thought it would be fun to make the consonant canvases vertical and the vowel canvas horizontal. Here are some pictures of the progress:


I had a lot of fun doing this. It could also be a great project for kids to make name plaques for their bedrooms. You could also easily attach these together with screws and small slats of wood or metal. I used Gorilla Glue to attach the buttons on the canvas. I tried the mod podge, but it wasn't strong enough to hold all the buttons. {Be careful though because Gorilla Glue is stronger than regular super glue and can make your fingers really sticky!}

Friday, May 11, 2012

I tore up a vintage Shakespeare book for what??

Here is my latest DIY project! It's still in progress, but here is what it looks like so far and how I did it.
I started with 1 blank canvas, mod podge, a paint brush, and 2 old books that I could tear pages out of. I mixed the mod podge with a bit of water to make it a little thinner. I painted the mod podge on the blank canvas, covering all of the front, and laid pages over it in different patterns. I had to paint between layers of paper where it wasn't touching the canvas.


At first I just laid the pages out flat, not worrying about the edges.
After the pages were laying and glued down to the front of the canvas, I painted glue on the edges to wrap the extra paper around the canvas. 

This was my final product {for now} after a last layer of glue over everything.
I hung the canvas on a hook in my garage to dry so it wouldn't stick to anything and could dry without little children's hands touching it!

I plan to add colorful buttons in the shape of letters to spell out a word. I will continue to update you as the project continues.

Wednesday, May 9, 2012

Projects on the horizon

I made the mistake of telling my mom about this blog I've been doing. Her eyes lit up and she began to make a list of projects that she wants me to do around the house for her. GREAT!!
Here is the list she gave me so far. {There is sure to be more added to this!}

• Redecorate our dining room
     ~ including painting, recovering dining room chairs, painting chair wood and dining room table.
• Repaint the bench on our porch
• Recover kitchen chairs
• Decorate the upstairs bathroom
• Repaint the kitchen

Here are some ideas that I have for some of these projects:


My mom and I went to a fabric store and looked at fabric for the chair projects. This striped fabric is what my mom picked out for the dining room chairs. The walls in the dining room have a white chair rail with a burgundy color on the bottom half of the wall and tan carpet. We plan to paint the chairs and table a chocolate brown color, so this fabric will match great. The color isn't exact in the picture, but it has some black, some brown, tan and a golden brown color.


She would like the chairs in the kitchen to coordinate with those in the dining room, but not match exactly. We found a few different fabrics we liked, but after my sister vetoed one of them my mom decided she liked the other one.  This is the one we all liked. It has a black/brown background and white, golden brown, and tan.

I'm open to suggestions for the bench color. It sits in front of the red brick portion of our house. Currently it has dark brown wood and a hunter green steel frame. I was thinking of painting the frame black and the wood an orange-yellow. I thought of orange first, but my parents ride Harley Davidson motorcycles, so we don't want more orange and black decoration! We were also throwing around the idea of painting the slats of wood different colors {obviously yellow and black aren't an option!} but I'm not sure what colors would work best.

Monday, May 7, 2012

Are you brave enough to try this design idea?

Black walls?

Even though I think the results in the home pictured here are stunning, I'm still hesitant to put something this dark on my walls. What about you?

Source

This living room has a black accent wall and it looks gorgeous! The pop of white in the fireplace is perfect to balance, along with the mirror and throw pillow!


livingroom 1
source


   The host of HGTV’s Candice Tells All, Candice Olson says, "A room with windows that face north or east will get cooler light, for which light caramel or buttery hues are a good match.

In contrast, south- or west-facing windows bring in warm light; “soft shades of warm colors,” she says, are good at playing it up. Rooms with low or moderate natural light are excellent places for walls with cool colors, like blue or moss green. These hues might be significantly altered in a sunnier room, where the light’s yellow tinge could turn blue into green, and green into lime.

Olson mentions a way of testing colors that we’d heard of before, though it sounds even better coming from a TV star. Basically, if you want to test a potential wall color, paint some of it on a big card and hold it up to the wall (or even attach it). You’ll see how the color interacts with the room’s natural and artificial light, and you can examine the card at various times of day. Just bear in mind, as Olson does, that incandescent light, like sunlight, has a yellowing effect. Halogen lights, on the other hand, tend to show colors accurately.

Accent walls are a fine way to introduce “riskier” colors; one black wall is a far cry from four. Olson gives standard advice: Accent the longest wall, or the one that frames the room’s main piece(s) of furniture. She also mentions that tinting a room’s ceiling with a bit of what’s on the walls softens the transition between them. Unless she’s dealing with an unusually small room, she generally paints trim in a color that contrasts with the walls.

One of Olson’s color schemes sounds particularly elegant. She recommends painting dining-room walls in a dark navy blue, which can beautifully complement both crystal and silver. For those with an even greater taste for drama, black is the answer. “Everything goes with it,” Olson observes, and it can generate a feeling of mystery without 
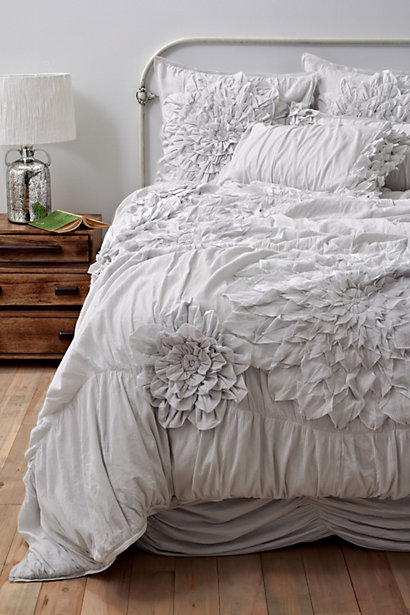
descending directly into Gothic gloom. Living rooms and bedrooms are, in Olson’s opinion, the best places for black walls. A glossy finish and robust lighting help keep things stylish. In the kitchen, one wall at most should be black, she says. Use the color even more sparingly in the bath.

Friday, May 4, 2012

Tiny bathrooms need love too!

Small Room Decorating: How to Decorate a Small Bathroom
By Kathy Woodard

Decorating a small bathroom isn’t just a problem that apartment dwellers deal with, homeowners and renters alike can have this issue. Since this is a high use room, decorating a small bathroom needs to take into account function and not just appearance. Here are some top tips on how to decorate a small bathroom!

• Create both decoration and functionality by making your storage solutions as pretty as in any other room. Use attractive wall baskets for lightweight items. Instead of a predictable étagère over the toilet, install attractive shelving. Place a shelf along the top of the bathroom mirror and use to add pretty accessories and store extra linens in pretty rolls or neat stacks. Install robe and towel hooks made of brushed silver instead of chrome. Make sure a basket or bin is available to store all personal care items out of immediate site. Weave ribbon through the storage baskets for an easy bit of style and color.

• Use one larger bath rug instead of two smaller ones. Having just one rug prevents the floor from getting broken up visually and makes the whole room appear larger.

• Just because you already have a bathroom mirror, doesn’t mean you can’t add more. A collection of small mirrors hung as a group is perfect to decorate a small bathroom. The extra mirrors will reflect more light and create visual room where there is none, and they are stylish too! (And think, teens will have no excuse in fighting over the mirror!)

• Considering the bathroom mirror, add some simple style to yours. Using frosted glass paint from your craft store, tape off and paint a border around the edge of your bathroom mirror. If you are a renter, you can use the paint made to create faux stained glass and will be able to remove it when you leave! I sponged mine on for a great ethereal look.

• Small details count in a small bathroom. Add touches of lace or fabric trim to the edge of your towels. Glue pretty beads onto drawer pulls. Use tassels as tiebacks for your shower curtains.

Decorating a small bathroom doesn’t have to be boring and it doesn’t have to be utilitarian. Just use these easy guidelines and go from boring bath to bathing beauty!

source 

Wednesday, May 2, 2012

Small spaces? No biggy!

8 Tips For Decorating A Small Bedroom
By Lee Dobbins

When decorating a small bedroom then it makes sense wherever possible to conserve the floor space you have in order to make a cramped room feel larger than it really is. Below are some small bedroom decorating ideas which should help you to achieve the right result for such a small space.

1. If you do not have enough space in the room for small bedside table then why not place a wall mounted shelf next to the bed. It will have enough space on it to place an alarm clock, books, photos and other items which will personalize the space for you.

2. If you do not have the room for a bureau or closet then use under bed storage instead. They can either be made from inexpensive plastic or if you wish you can have some made to order from wood. But it is important that you have enough space beside the bed so that you can pull them out when you need access to them.

3. For those of you who want to watch a little TV before going to sleep then fit either a wall or ceiling mounted TV stand. You will be able to purchase one in any good DIY store or store that specializes in storage products.

4. The colours that you use on your walls in a small bedroom should be neutral tones and only 2 or 3 hues of this colour should be used in the room. It is important that you paint the moldings and doors in the room in the same colours as the walls by using contrasting colours you will be making the room feel smaller than it is. The ceilings should be painted white as they will provide a sense of height to the room.

5. The furniture for such a room should be clean lined and have small delicate patterns on it which will help to foster the illusion of space.

6. Open up the room by maximizing any views that it may have of the outdoors by using light fabrics or blinds at the windows.

7. Ensure that the room is well illuminated as this will also provide a sense of space in such a small room.

8. If you are able to add a mirror in a position opposite a natural form of light as this will help to provide further light into a room and therefore create the illusion of space.

Hopefully the small bedroom decorating ideas that have been provided above will help to create the haven of peace and tranquility that you are looking for in such a confined space.

source